 Subscribe to BGE Tutorials!
UV Texturing is how you texture inside of Blender. It can be quite difficult, so this tutorial will help you learn the basics of unwrapping/texturing simple meshes. You will also learn the basic techniques in unwrapping complex textures.
GameGuide Part 3: Design
December 14, 2007 — BGE TutorialsDesign of a videogame includes a lot of different parts. You must design the story, an artstyle, a storyboard, characters, levels, items and all of the features (such as AI) in your game. This will be one of the most difficult parts of making the game. This is mostly because this is what the entire game will be based off of what we do here. If we make a lot of errors
in the design, there is a small chance that you will have to go back to where the problem is and redesign it. To begin, we will first talk about the storyline.
Story/Artstyle
We have already discussed what you should include and exclude from your storyline, but now we’re going to talk a little about
how to get a decent art style from your story. First, read through your story and try to get a good picture (I usually try to make the story into a movie in my mind). If you’re having issues trying to get an artstyle for your game, then begin to think to yourself, “is this a horror game? Is it upbeat and happy? Is it full of violence, or is it a nice, fun arcade game?” By asking yourself what the game’s storyline is like, you can start making the artstyle. For instance, I want to make a nice, simple, happy little platformer. The artstyle will be colorful, and bodyparts and other proportions will be exaggerated if you were to go for colorful, and cartoony that is.
Storyboard
Now that you have a basic storyline and artstyle, we can begin making a storyboard. But first, we need to learn what a
storyboard actually is. Well, to simplify it down, it is much like a comic book, but usually not as pretty looking. You take hundreds of little papers and draw different scenes on them. Then you arrange them in chronological order and start posting them on a board, so everyone can get a better picture of what the game will be like. Here’s a small storyboard for a Yogi Bear short:

In this storyboard, Each part of the scene is sequential, and includes sounds to include and some dialogue, too. You can also add arrows to show where something should go (if moving). Really, it can be as organized as you want it. The more details you can include, the less that the development staff has to assume or ask about, which can save time, and also makes sure you get results you want to see.
Designing Characters
We have our story, an art style, and a storyboard. Now it is time to move to some of the more detailed designs. Have the artists create detailed sketches of the characters. Have a side sketch, a front, and a back sketch made. It wouldn’t hurt to add some sketches of your characters doing something rather than standing straight with their arms stretched outwards. Work on improving the character’s look, then have the sketch cleaned up and colored. This will give the modelers a really good idea of what to do with the models. Remember to do this for all of the characters (no matter how small they may be), so that modelers/animators can get a good feel for the characters.
Designing Levels
Level design is something that can be quite tricky. You must fit the artstyle, and make it functional/accessible to the character as well. Your artists may want to draw many (and I mean many) sketches, including: maps (arial views of the level), sketches of different parts from different angles, and anything else you can make sketches of. Again, you need to color them after all of the details have been established for the modelers/animators.
Designing Items
Item design can be as simple or complicated you want. Try to make the items feel like they fit in with the artstyle and feel
of the game. Get sketches, clean them up/keep them detailed, then color them. You starting to get the drift? This is basically what you should do for every single little thing in the game.
Designing the Features
Go through all of the little details and get a list of all of the things you want to include (Health bar, item inventory, ammo,
ability to upgrade items, talking to villigers, etc.). When you have a list of everything you’d like to see in the game, start
speaking to programmers about what they think could make, then write a list of what they can make for the game. Some
features are harder to program than others, so you need to be sure you have experienced programmers that can handle
most of what you throw at them. If they cannot do most of what you want, just try to do without those features and simplify your game to the programmer’s abilities.
What Next?
Well, there shouldn’t be much more to design, unless you have vehicles or anything that I have not talked about (which you should make detailed designs for everything), then you are ready to begin modeling and creating the game. This means that, yes, we are done with the main design process. You may see yourself going back and making slight changes to your original design, which isn’t a bad thing at all.
<<Planning | Index | Modeling>>
Muting Sound
December 6, 2007 — BGE TutorialsMuting/manipulating sound can be a rather difficult task. In this tutorial, you will learn how to set up this simple script to manipulate sound. I will be using this script to get a sound to mute, without stopping and having to restart, but you will be able to do much with this little script if you know how to use it. 😉
How to Set Up a Network Game
December 4, 2007 — BGE TutorialsThis tutorial is not by me. It is by friend and co-admin of the gameblender.org forums, OldJim. He has been working on a network game template, called WSAG. It is an up and coming Network game template, and has been mentioned on different parts of the net. BZoo is the leading template, but his is coming up.
You can download his network game template and the tutorial HERE.
Again, thanks goes to all to OldJim 😀
Basic Character Movement
December 4, 2007 — BGE TutorialsIn this tutorial, you will learn how to move your character around while having the camera follow behind. Do not pay attention to the graphics, as I am not showing how to make the graphics of a game, just merely showing you the basic concept. Read the rest of this entry »
Introduction to BBCode
December 3, 2007 — BGE TutorialsBBCode (bulletin board code) is code that is used on boards, such as the PHPBB bulletin board systems, and has about the same functions as HTML. This tutorial is gameblender.org specific, but the tags are the same as any other site that supports BBCode.
Links
This tag will display the full url in the link. Just replace my URL with the URL you are linking to.
[url]http://www.google.com[/url]
what you get:
Named Links
This tag will allow you to link to any URL, and name it. Replace “http://www.google.com” with the URL that you are linking to, and replace “LINK” with what you want the link to say.
[url=http://www.google.com]LINK[/url]
What you get:
Images
This tag will add images to your posts. Just replace my URL with yours.
[img]http://www.google.com/intl/en_ALL/images/logo.gif[/img]
What you get:
![]()
Linked Images
This is a combination of the Link and image tags. Take a look:
[url=http://www.google.com][img]http://www.google.com/intl/en_ALL/images/logo.gif[/img][/url]
What you get:
![]()
Changing text color
These tags will change the text color. Just replace the 000000 with the hex code of the color you want (you can find this with MS Paint, or Photoshop by clicking on the color palette, and choosing your color. There is a HEX field somewhere, just copy & paste the number into the tag).
[color=#000000]Type your text here[/color]
What you get:
Type your text here
(Note: It looks like nothing has changed, but I assure you, the Hex code I used was for black (#000000). White is
(#FFFFFF).)
You can also try adding words like “red” or “blue” instead of the hex colors. Each computer can read these values, but the
Hex code is different for each computer.
[color=”red”]Type your text here[/color]
What you get:
Type your text here
Bold, Italic, and Underline Tags
You can also use bold, italic, and underline tags to manipulate your text. Here are the different tags:
- Bold: [b]Type your text here[/b]
What you get:
Type your text here
- Italic: [i]Type your text here[/i]
What you get:
Type your text here
- Underlined: [u]Type your text here[/u]
What you get:
Type your text here
Displaying Codes
You can display codes in BBCode, by using the following function
Type your text here
What you get:
code:
Type your text here
(Note: The code will be inside of a box on bulletin boards. I am using HTML to display this.
Smileys!
You always have to have smileys in a forum. On the GameBlender.org forums, there's a limited supply, but here are some I have collected thus far(be sure to remove the # sign, when using these codes):
#:lol: = ![]()
#:D = ![]()
#:cool: = ![]()
#:P = ![]()
#:( = ![]()
#:) = ![]()
#:| = ![]()
#:o = ![]()
#:/ = ![]()
#;) = ![]()
#:mad: = ![]()
Why can't I use some BBCodes on GameBlender.org?
There are a lot of fun BBCodes out there that are blocked from use with the site's forums, such as the and [list] tags. I have no
power over this, I guess you'll just have to make due with what you do have.
Exporting Game as .EXE
December 3, 2007 — BGE TutorialsIn this tutorial, you will learn how to export your game as an .exe in Blender.
Step 1: Preparation
Open up your game, and go to File -> Pack Data. This will pack all of your data, so you don’t have to put all of your pictures,
sounds, and whatnot into the same directory.
Step 2: Exporting
You will need to go to File -> Save Runtime. Save it to a file you can find easily. Now, browse to where you have Blender installed. Copy(Ctrl+C) the following:
- avcodec-51.dll
- avformat-51.dll
- avutil-49.dll
- pthreadVC2.dll
- python24.dll
- python25.dll
- SDL.dll
- tk84.dll
- zlib.dll
- MSVCR71.dll
Now, browse to where you saved the runtime, and paste the files(Ctrl+V).
Step3: Finalizing
All that is left is for you to do, is to test it. Then you can zip it and you will have successfully exported your game as an .exe.
Problems?
Sometimes, we can get errors when exporting the game. One of the biggest issues is with python script. If you have some scripts not working in the .exe, then you can just put those scripts in the same directory.
Converting Stereo .wav to Mono .wav
December 2, 2007 — BGE TutorialsBlender uses only mono .wav files for 3D sound(3D sound tutorial). If you try to use stereo .wav files for 3D sound, you will not experience any difference with the 3D sound settings than you would with normal sound settings. In this tutorial,
you will learn how exactly how to change a stereo .wav file to a mono .wav file with Audacity.
Step 1: Download Audacity
Go download Audacity from their website and install it. When you have everything all set, open up the program.
Step 2: Open File
Press Ctrl + O (or File -> Open) and browse for the file you’re looking for.
Step 3: Splitting the track
Click the arrow on the track, and select “Split Track”.

Now, delete the bottom track, by clicking the  button.
Step4: Setting the track as mono
Now we can set the track as mono. Press the arrow on the track again, and select “Mono”, like so:

Step 5: Exporting the .Wav
Finally, we can export the .wav. Go to File -> Export as Wav, like so:

All that is left for you to do is to save the file wherever you want, and viola! There you have it. I hope this was useful for you.
3D Sound in Blender
November 28, 2007 — BGE TutorialsI have been searching and searching for a way to get 3D sound in my games in Blender. Just this past week, I decided to ask my friends over at GameBlender.org how to do it, and they helped me out. Now, I am going to share the wealth of knowledge with you.
Step 1: Opening Blender
As always, you will need to open blender. Split the workspace however you want and open the Audio panel in one of
the workspaces.
Step 1: Opening the sound and setting it up
Split the workspace and open the audio panel in one of the workspaces.
Now that you have the audio panel open, it is time to load a .wav file. It is absolutely imperative that you load only mono .wav files (Blender can only read mono .wav files when dealing with 3D sound). To learn how to convert stereo .wav files to mono .wav files, CLICK HERE. Now, load the mono .wav file, and continue. To load an audio file, click on the button in the following picture and browse for the audio file and click “Load”.

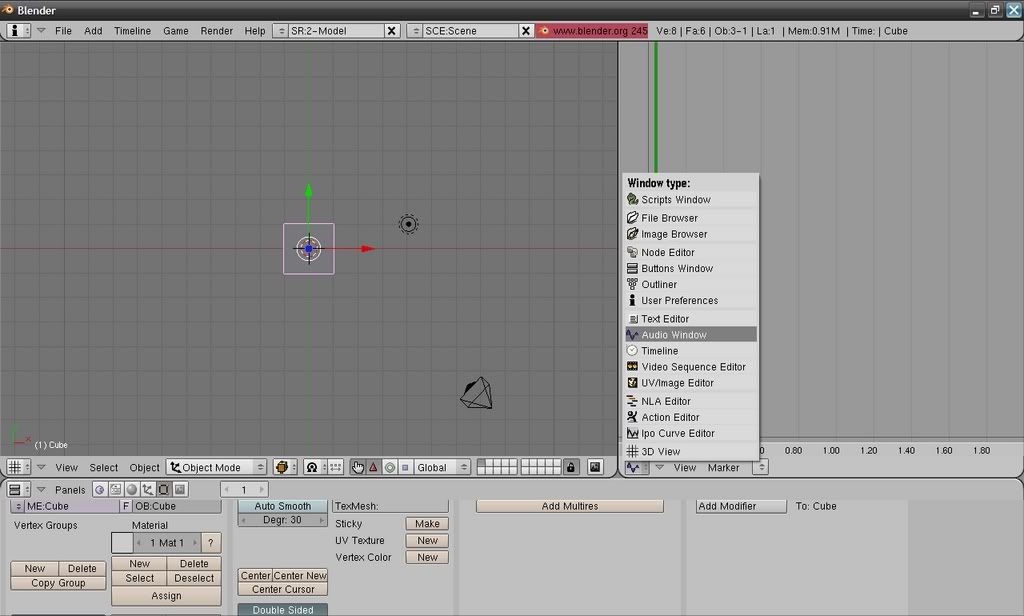
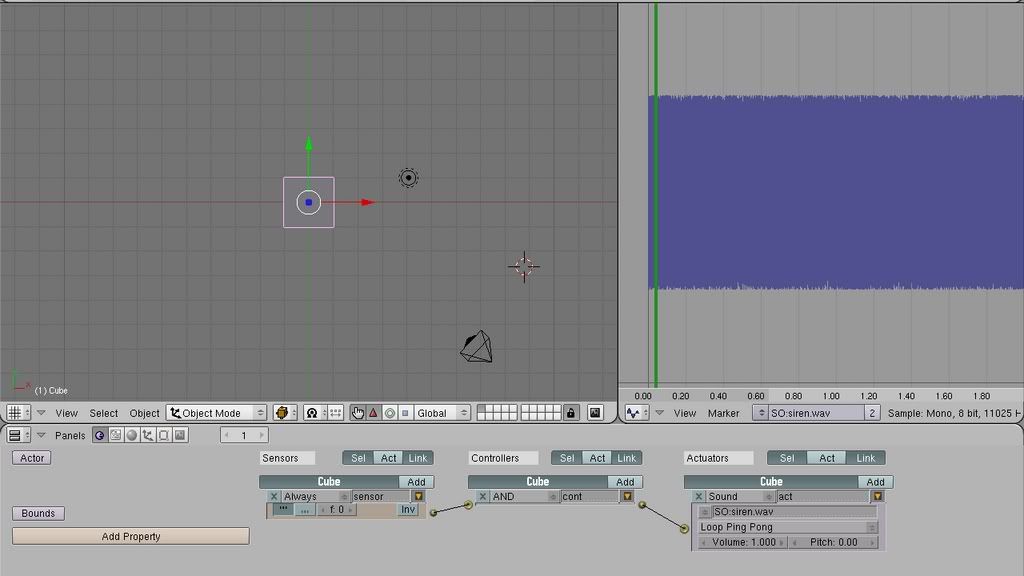
Logic Bricks
Now, select the object you want to apply the 3D sound to, and go to the logic brick panel (F4) Set up your logic bricks to play the noise. For mine, I am just going to have an always sensor, and controller, and a sound actuator (loop ping pong). Compare what you have with what I have here:
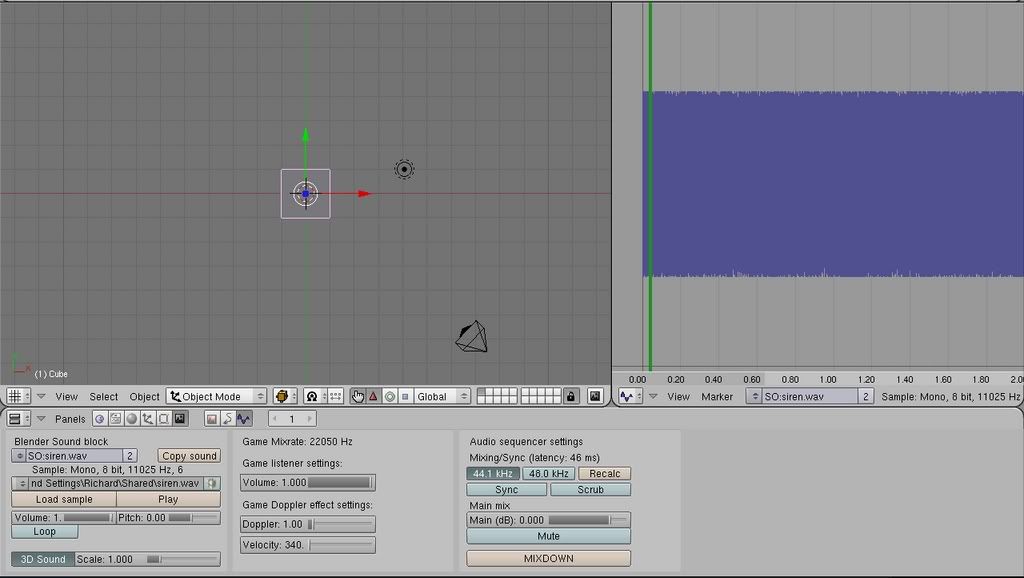
Now, go to scene in the buttons panel (F10), and click on the sound block button( ). Open up the sound you are using, and push the 3D sound button. If the button is not available, then you are not using a mono .wav file. When you are done, you can mess with the range, doppler value, velocity, and any other values you want. Again, here is a picture of something similar to what you should have:
Testing
Now, make sure your object is close to the camera, so you can hear the sound (as the sound is determined by the distance of the object from the active camera). If you cannot hear your sound, then here are some things to check:
- Check your logic bricks to see whether you have the sound set to play (if everything looks okay, try using the logic bricks I used just for testing purposes.)
- Check volume settings in the sound brick tab (in the scene tab), and the volume for the sound in the Logic Brick panel (F6)
.Blend Download
Here’s the completed .blend for you to compare to: Download 3Dsound.blend (NOTE: If you cannot hear the sound, turn up your volume)
Acknowledgments
I would like to thank Raider (from the gameblender.org forums) for showing me how it’s done.
Fixing Smoothed Faces
November 9, 2007 — BGE TutorialsNothing bothers me more than the blackened vertexes of smoothed faces. What do I mean? Well, here are some examples:
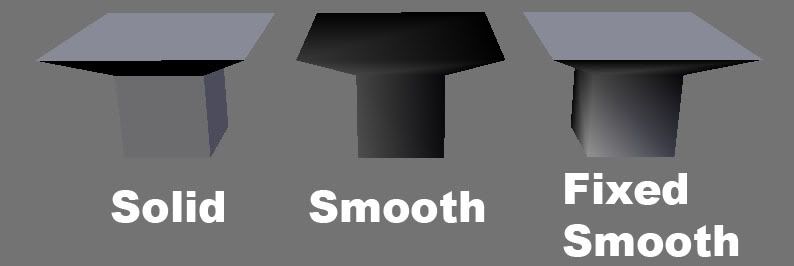
The solid shape on the leftmost side is the default setting for primitive meshes. They have hard edges (which is good for boxes and other objects with sharp edges). The smoothed mesh in the middle is used to make nice smooth edges (like for a ball). In some meshes, though, you will get ugly black vertices. To fix this problem, go into editmode (F9) and select faces that are connected to the black vertices. Once you have them selected, press the “P” key and click “Separate Selected”. Now those faces you separated have went into a new mesh. It should look better now. “Fixed Smooth” on the right-hand side is the fixed version of the middle mesh. You can see how much better it looks.
This example I made isn’t really what you would see, mainly because you really don’t want to smooth cubes. You would definitely see this used with more complex meshes.
I hope this was useful for you. If not, then
I accept requests, comments, critiques, and links to other tutorials. Post a message to me at: bgetutorials [at] live.com
