 Subscribe to BGE Tutorials!
In this tutorial, you will learn how to move your character around while having the camera follow behind. Do not pay attention to the graphics, as I am not showing how to make the graphics of a game, just merely showing you the basic concept. Enough babbling, and onward to the tutorial…
Step #1: Start Blender
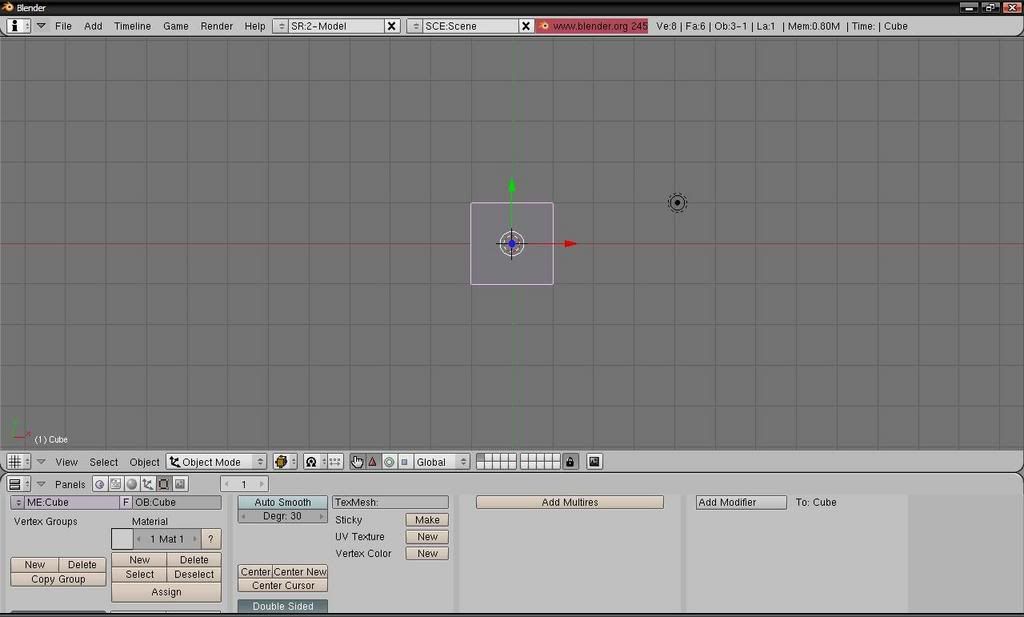
Now start blender by selecting the icon. You should see something similar to this:
Step #2: Creating Our Scene
As you can see, we have just a cube in the middle of the stage. Select (right-click) and delete it. Now insert a plane, a sphere, and an empty. Select the camera, hold shift, and select the empty. Press Ctrl + P to make the empty a parent to the camera. Now, select the empty, hold shift, and select the sphere. Again press Ctrl+P. This will set the character as the parent of the empty. Now that you have all of the parenting set, select the sphere, and move it up on the Z-axis so that it is a little higher than the plane. You should now have something that looks like this:

Step #3: Correcting the camera
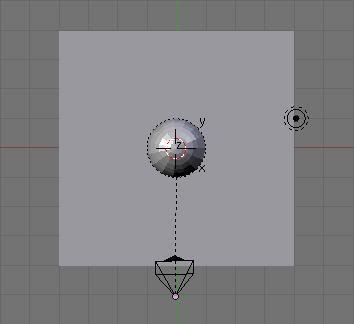
If you run the game at this point from the camera view, you would notice that the ball moves in a diagonal direction. This is because the default camera position is facing the center from a 45° angle. You must move the camera behind the object, and rotate it so that it is facing the object. Here is a top-view of the corrected scene. It should look something like this:
Step #4: The Logic Panel
Usually when creating a game, you must put some kind of code in telling the character where to go. For our game here, our character is nothing more than a sphere. Now, I said earlier that there is no programming necessary for crating this game. Everything is done in the logic panel. To access this panel, press F4. Make sure you have the sphere selected. You should see something like this:

Step #5: Physics & Collision Detection
We need to make it so that gravity affects the character and. Left-click the “Actor” button, then click the “Dynamic” button. Now, Click Bounds, then change the collision type to “Convex Hull Prototype”.
Let me explain a little about what you have just done before we continue. When you selected Actor, you have established collision with the object. This means that when another actor collides with it, the other object will be stopped, although this object will not move when there is a collision, and will not be affected by gravity. To do this, we must make the actor dynamic, and this is why we selected dynamic. It is now affected by gravity, and will move when hitting other moving dynamic actors.
There are so many different models/shapes you can have as an actor. The default collision type is box. This collision type isn’t good if you have a complex object. For example, you have a hilly landscape. If you leave the default collision type, then your character will walk across the top of the hills. The character will not walk down the dips. There are six different types in Blender:
- Box – This is the default. An invisible box surrounds the entire object.
- Sphere – An invisible sphere is drawn around the object
- Cylinder – An invisible cylinder is drawn around the entire object.
- Cone – An invisible cone is drawn around the entire object.
- Convex Hull Polytype – doesn’t have a set shape. It wraps to any convex object.
- Static Triangle Mesh – for triangle meshes? (I don’t know much about this one. Please fill me in if you know. I will cite you as a reference)
Step #6: Creating the Movement
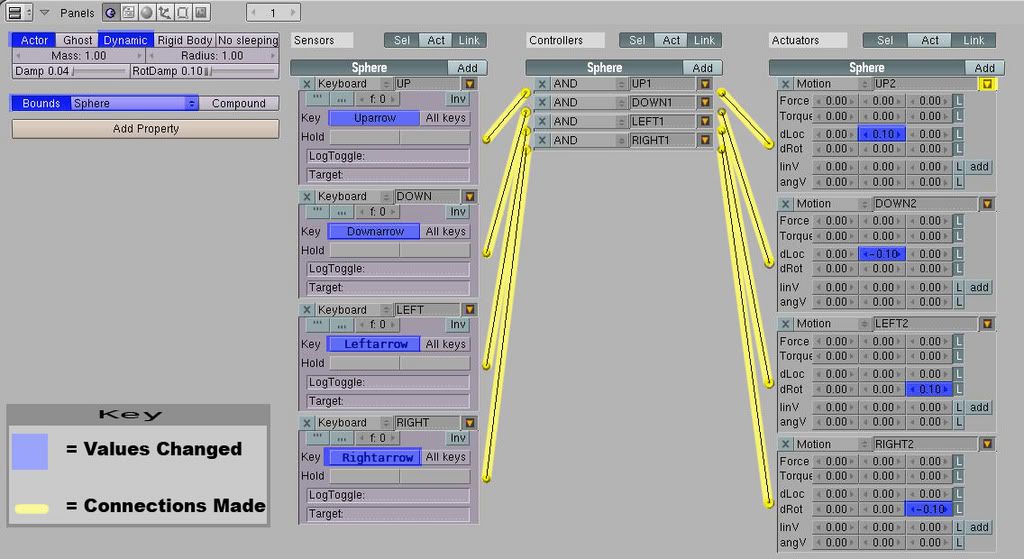
Now, we must make the character move forward, backward, turn left, and turn right. To do this, we must first click “Add” for the sensors, controllers, and actuators. Add four for each one. Connect them together (connect 1 to 1, 2 to 2, and so on), by left-clicking and dragging from one connection to the other (the circles). In the end it should look something like this (note: the blue box shows changes that should be made, and the yellow lines are new connections):
Step #7: Testing Your Game
Make the 3D viewport as big as you can make it, and place your cursor in the viewport. Press P to begin the game. Try using the arrow keys to move your character around, trying not to fall off the edge. To end the game, press the Esc key. If everything works, then you have reached success, and if not, then you need to go back and try to troubleshoot your problem.
Step #8: Giving Feedback
Now that you have finished the tutorial, please give me some feedback. Tell me whether this was useful, if I had faulty information, if I have skipped a step, or whatever. I will also accept requests for different tutorials dealing with GameBlender.
Final Notes
I hope you have the basic idea. I encourage you to mess with some of the values with the dynamics, and the movement node, and see what the effects are. I would tell you, but I have learned that discovering things for yourself is more effective than having the answers given to you.

April 22, 2008 at 5:26 pm
I used your setup in the game i am creating. my character rolls and rotates all over the place. Is there a way to constrain the X and Y axis rotation so that only rotation on Z axis is aloud. If Z is the axis pointing through characters head to the sky.
this would allow left and right rotation but not all this other business.
I think this should be looked at for your tutorial.
April 25, 2008 at 5:24 pm
I believe you have put numbers in the wrong place. It should only rotate around the Z axis. I believe your problem lies in the Actuators (see the last image as a reference to fix your problem.) The values for nodes Up2 and Down2 should be in DLoc, and the other two should be in LEFT2 and RIGHT2. Also, be sure they are set to local (the L on the right).
Also, be sure that you do not have “dynamic” set for the actor. This would cause rolling and whatnot.
April 26, 2008 at 2:15 pm
very good tutorial, it works and I am impressed. It makes me feel confident enough to begin experimenting further.
There is clearly some demand for short well worked out tutorials and I hope you keep doing this.
Thanks a lot
April 30, 2008 at 1:26 pm
Thank you. Since I have gained ownership of GameBlender.org, I haven’t had much time to work on these, but I will eventually transfer these over to the GameBlender.org Wiki 🙂
Thanks for reading!
May 4, 2008 at 5:39 pm
Now, how do you make the charctor (spelt wrong I know) have moving animations?
May 6, 2008 at 9:13 am
For the character to be animated, you will have to make a skeleton (armature), animate it, then add “Action” armatures to each of the keys (left, right, up and down). From there, change the “sta”(start), and “END” (End) frames located within the actuators.
May 12, 2008 at 2:16 pm
There is an easier way to make a camera follow something.
1. Make a camera
2. Go to the Logic (F9) panel
3. Add a camera Sensor, Controller, Actuator
4. Make the Sensor only run once
5. Connect everything
6. Make the Actuator a “Camera” and type in your objects name.
Set the max-min distance, and the height and thats it.
Its the first tutorial on this webpage
http://www.tutorialsforblender3d.com/Vehicle/Vehicle_3.html
May 12, 2008 at 9:08 pm
The point of this tutorial wasn’t as much of a tutorial on how to make a camera follow an object as it was trying to learn the basics of movement. However, I would like to thank you for posting this for all to see 🙂
October 18, 2008 at 3:38 am
I cant get it to work ive been trying so much : ( when I enter the game i just see a plane and thats it idk what i did wrong i did exactly what you did in this tutorial.
October 24, 2008 at 1:58 pm
i thought F4 was shortcut for Logic Panel…F9 is for Editing if i’m not mistaken
December 2, 2008 at 1:07 am
This was a cool tutorial!
It was cool to change view for ortho to prespective and see how the character motion took a whole other feel.
January 15, 2009 at 10:14 pm
@ emzy: Yes, thank you for finding that mistake. I will fix it immediately.
I can swear it was F9 at one point… Meh.
@nero123: Thanks 🙂
April 2, 2009 at 12:38 pm
is there any ways to detect coordinate position of player object?
December 13, 2009 at 9:00 am
Yes. It requires that you know a bit of python, but the code would look something like this:
controller = GameLogic.getCurrentController()owner = controller.owner
print owner.worldPosition
For coordinates in a square, you’ll need to use two empties and do some simple calculations between all of their positions.
April 10, 2009 at 12:52 pm
Regarding the “static triangle mesh” collision type:
In other physics simulations, like Havok, primitive types like box, cylinder, or sphere calculate very quickly, so they are used whenever possible. A lot of game characters use a simple cylindrical shape. Next fastest is the convex hull, and you can use those to get a better approximation of a shape. However, as the name implies, the hull is convex, so if you have a concave shape that needs to be accurately simulated, you may need to use a collision bounding shape that is exactly the same shape as the object itself…the static triangle mesh. However, this is far, far more expensive to calculate since each triangle of the mesh needs to be tested for collisions, whereas simpler shapes like spheres can be calculated with mathematical formulas. In commercial games, static triangle mesh collision is avoided as much as humanly possible since it is so expensive to calculate.
I don’t know for sure that this is the same for Blender/Bullet physics, but everything else seems similar to other physics simulations.
July 12, 2009 at 4:08 pm
I sure hope this site is still active.
I created an action animation for my character with armatures and set up the logic bricks so that it would play when I pressed space. However, nothing happened. How can I get this to work?
August 14, 2009 at 9:13 pm
hey um… don’t you think this is a little simplistic? for one, using a location change will walk your character right through a wall if I am not mistaken the character can only successfully be moved around a more complex scene using forces. And it would be really nice if you or someone would combine character animation with the game engine in tutorial form. sure there are lots of tutorials on character animation, and lots of tutorials like this, but none that actually blend the two.
December 7, 2009 at 7:45 pm
Simplistic? The entry is entitled “BASIC Character Movement”. It discusses the basics in moving objects. Now, I would apply forces instead of dLoc to prevent collision issues.
To blend animation with movement, simply activate the ipo or action when you also activate the physical movement.
September 3, 2009 at 6:43 pm
Hey, don’t know if this is still going, but I tried it out. Works nice and all, but I tried it in a canyon and my person keeps glitching through the walls…Any ideas?
November 29, 2009 at 8:05 am
can you please make a moving platform tutorial?
showing how to move and rotate this platform
December 7, 2009 at 7:33 pm
For platform movement, simply use IPO curves. There are numerous tutorials on that.