 Subscribe to BGE Tutorials!
I know many people keep asking how to make realtime text in Blender. The answer is quite simple.I will walk you through the steps of making text appear in realtime.
Step 1: Setting up the Scene
Start up Blender, and delete the default cube. Go into the front view (numpad 1) and set the orientation to orthographic (numpad 5 or View->Orthographic). Now insert a plane, and scale it down a little (if you want). Go into UV Face Select Mode (F), and select the face. Go to the editing mode (F9) and set the face as Alpha, Twoside, and Text. Be sure to set the draw-type to “texture” (Alt + Z), before going on, or you will see no results.
Step 2: Setting up the text
Download this file, and save it somewhere that you can easily find it. Go back into Blender and split the 3D screen into two (right-click the right-side of the 3D screen and choose “split screen“) Now change the screen type to UV/Image Editor. Image>Open to open a picture, then browse for your picture. Highlight it, and choose open. Now, press A in the UV/Image Editor to select all verticies. You should have something like this:
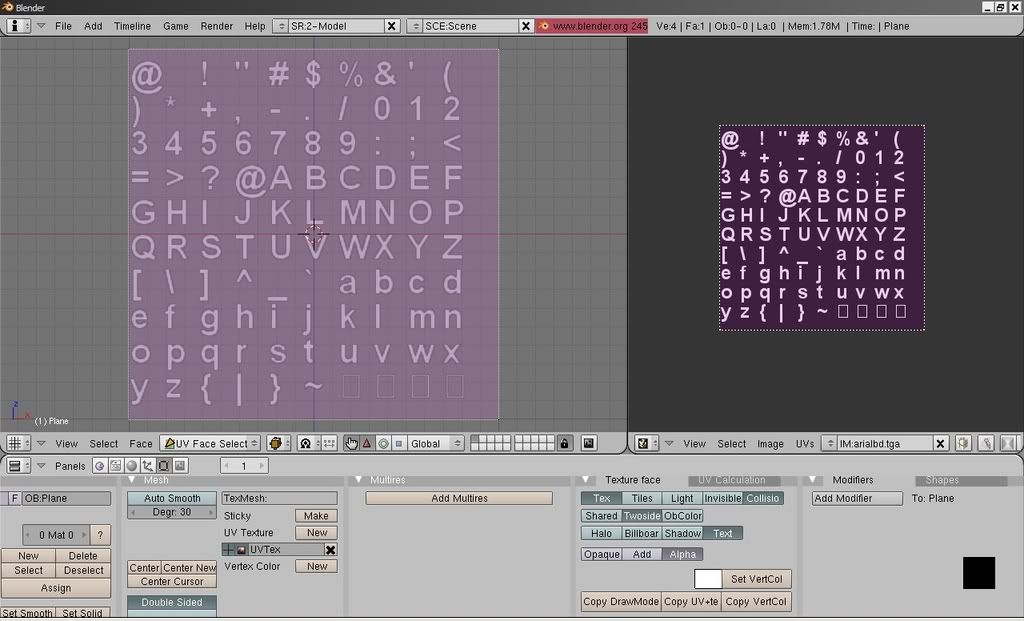
Scale it like so:

Step 3: Creating the Text
Now we are ready to make the text show. Go to the Logic Panel (F4) and click Add Property. Change the Prop Name to Text. There are different things you can show:
- Int – This will display an integer
- Float – shows any number with up to 3 decimal points
- Timer – Self explanatory
- Bool – Boolean (the value is either “true” or “false”
- String – A collection of Characters
For the property type, we will choose String. insert something (I put “Hello World!“). Compare yours to this:

Exit the UV/Face Select Mode, by pressing “F” again, and compare your screen with this one:
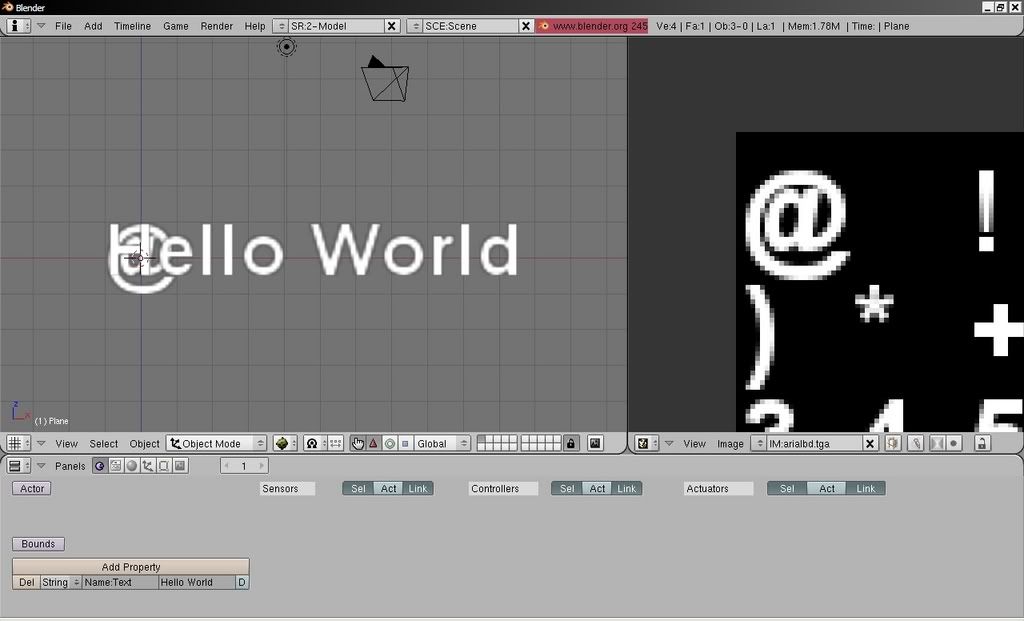
Now, all that is left is to test your work. It should look something similar to this:
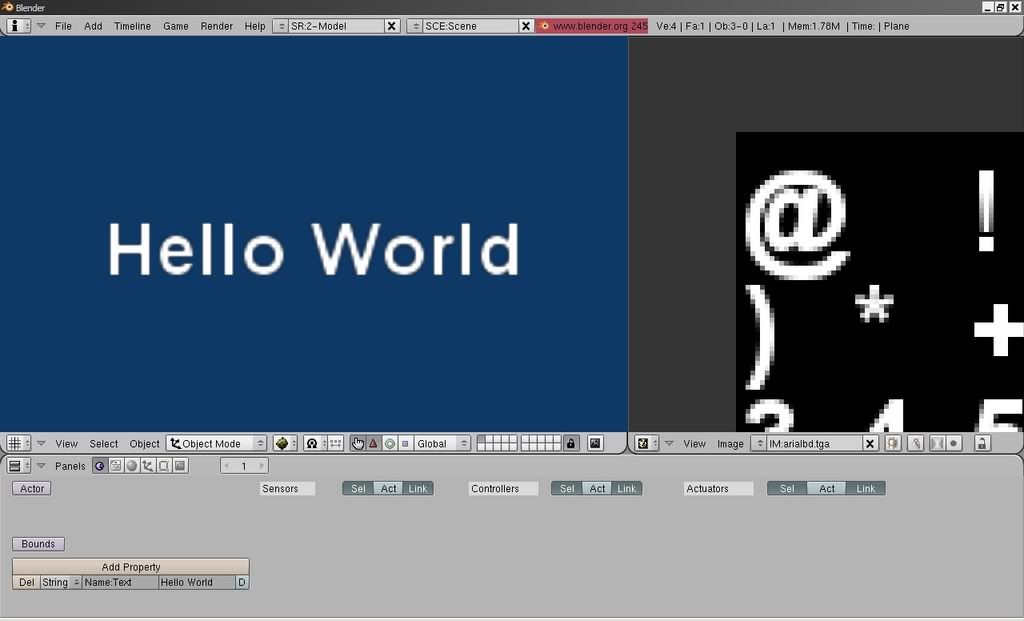
If you have it working, then you are complete. If not, go back, and try to fix any issues you have. If it is still not working, then download the file below, and compare your file to mine.
.blend
Here is the completed example file: ![]() Download
Download
Last Notes
If I have left something out, there is wrong information, or if the links are broken, feel free to e-mail me at: bgetutorials [at] live.com
I also accept requests for new tutorials.

November 8, 2007 at 2:01 pm
Dont forget to activate the Text button in Texture face pannel of Editing (F9) while in UV face select mode.
Thank for cool tutorials
November 9, 2007 at 12:10 am
“Go into UV Face Select Mode (F), and select the face. Go to the editing mode (F9) and set the face as Alpha, Twoside, and Text.” This was in the very beginning of the tutorial. Thank you for your input, though.
November 9, 2007 at 2:27 pm
Thanks
November 20, 2007 at 6:15 pm
it don’t work why
November 20, 2007 at 7:27 pm
Well, did you follow all of the steps? Pay close attention to all details, and don’t skip a single step. You should have it if you followed it.
November 28, 2007 at 5:35 pm
well no mader how I try it doin work i followed the steps carfully and it still dont work
November 28, 2007 at 7:00 pm
I forgot to upload the TGA (as it will not work with the JPG), just replace the arialbd.jpg with the new file (arialbd.tga). If that’s not working for you, download the included .blend file. Just remember to unpack the data (File -> Unpack Data) and press P to run it.
November 29, 2007 at 7:41 pm
thanks for the tutorial it now works
November 29, 2007 at 9:03 pm
Glad to hear 🙂
December 1, 2007 at 12:27 am
🙂
December 15, 2007 at 11:01 pm
do you know how i get to tuyp my text out like this asdfghjklzxcvbnmqwertyuiop
or just some thing you can show me a demo or some thing that would be great 🙂
December 16, 2007 at 12:26 pm
Are you trying to output the text “asdfghjklzxcvbnmqwertyuiop” or do you want dynamic text? If it’s the later, then I’m not too familiar with dynamic text as of yet, but I am getting there.
If you just want to output “asdfghjklzxcvbnmqwertyuiop”, then just type in asdfghjklzxcvbnmqwertyuiop as the value for the “Text” property. You can download the Demo, and just go into the Logic Brick properties, and replace “Hello World” with “asdfghjklzxcvbnmqwertyuiop”. Hope this helps 🙂
December 22, 2007 at 7:36 am
If you are familiar with Python scripts:
Here is an example of dynamic text I tried:
Add a (Always) game sensor and link it to a Python script controller
For the script (not efficiently coded):
import GameLogic
import time
from time import time
scene=GameLogic.getCurrentScene()
plane=scene.getObjectList()[“OBPlane”]
plane.Text=str(time())
December 22, 2007 at 7:48 am
Dynamic text: runtime changing of text
If you only have a fixed set of text to display, here’s a way to do it with just game controllers (no python scripting):
For example change the “Plane” object text when pushing “a” key.
For the “Plane” object Logic Panel:
Add a keyboard sensor to key A.
Link it to a controller.
Link the controller to a “Property” actuator.
For the actuator set the “Prop:” field to “Text”.
For the actuator set the “Value:” field to “Another Hello” –>note that this requires quotes around the value in the “Value:” field
December 22, 2007 at 4:49 pm
i wanting to make is so i can like add text like im chating to some one
December 22, 2007 at 7:53 pm
Try using the method mikemon wrote down. He did it two ways, the first one was with python script and the other was with just logic bricks.
December 28, 2007 at 7:47 pm
thank you for that mikemon it realy help:)
January 8, 2008 at 5:11 pm
does any one know how I can make text into a halo
January 8, 2008 at 9:41 pm
Halo’s are for rendering. Maybe you should ask at the http://www.blenderartists.org forum?
January 11, 2008 at 9:45 pm
no not the render kind the uvface kind of halo
January 11, 2008 at 10:57 pm
Oh. Just follow all of the steps in the tutorial, and select “Halo” in the face select mode. If you cannot see it when you press P, you’ll have to go into editmode and rotate the plane.
I don’t suggest using it. To keep text facing the screen, just put the text in a new Scene, and have an overlay scene actuator run the scene with the text. This way, you can easily change visibility of the text, and it is much easier to work with 🙂
March 25, 2008 at 5:21 pm
The text doesnt show at all, it shows it as squares instead.
Could this be an encoding problem?
March 25, 2008 at 6:03 pm
Okies I solved the problem, a complete newbie mistake.
I think it would be a good idea to mention that when viewing that the draw type should be changed to textured.
I was viewing it with the Solid draw type.
March 29, 2008 at 4:16 pm
Oh. I seemed to have skipped that part. It is a good idea, and I have added it in.
April 28, 2008 at 9:22 am
How do you make real time text a different color?
In ‘UV Face Select Mode’, I am able to apply a color to the text, but when I press ‘P’, the color is different!
April 30, 2008 at 1:10 pm
If you have a material set, you need to make sure that “TexFace” and “VCol Paint” is set. Also make sure you’re in texture view (Alt + Z).
May 1, 2008 at 3:22 pm
When I do as you have suggested, and press ‘P’, the text disappears and I am left with colored planes instead of text.
If I delete the material, then I am back to text again. What am I not understanding?
Also, I am setting the text color in Editing (F9) by way of ‘Set VertCol’. Does this make a difference in the advice that you have given me?
May 2, 2008 at 9:56 pm
Download the example file, go into vertex paint mode (V), and color. You should see the text turn a different color 🙂
May 24, 2008 at 7:23 pm
I have been trying to change the name of the Text property.
know how the text will only work if the property name is Text(with a capital T). what if I’m trying to make many text objects in the game engine and they all have the same name?
Thats too confusing. after you name it “Text” why cant you change the name of the property without breaking the text object?
May 27, 2008 at 8:17 pm
Blender uses Text as basically a predefined name. Properties and variables are different in Blender than they are in programming languages, such as C++ or Java.
I know it can be confuzing, but “Text” is a predefined name that has been taken by Blender. You cannot change the name of it, however you can change the value of it.
They may all have the same name, but they are not properties of the same object, which is why it works. If you get into C++, you will see how you can have an infinite amount of objects (classes) with variables of the same name. As long as you don’t try to have 2 variables (properties) of the same name in the same object (which Blender changes the name automatically if there is another property of the same name.
If you don’t understand what I’m saying, just understand that you cannot change the name of the “Text” property, and have it still work.
May 31, 2008 at 8:39 pm
thank you….
I kinda figured it out after looking some more.
nice tutorial
July 25, 2008 at 7:22 pm
wow i havn’t been here in a while now
0_o
August 8, 2008 at 6:56 pm
I have the same problem as Harry, it shows black squares instead of characters, even though I am in “Textured” draw type…
August 18, 2008 at 2:01 am
Make sure you have the texture settings right with your materials, and make sure you have “Tex” set for the face (find this out by selecting the face in editmode, and going to the “Texture Face” tab in Editing (F9))
August 21, 2008 at 9:38 am
i was working on a fps script
this is what is looks like
import rasterizer as r
import gamelogic
msensor.cont.getSensor(mouse)
con.cont.getController(move)
Motion.cont.getActuatros(mousemove)
int.gt=1
float.y=1.000
float.x=1.000
any ideas of what i could add or change
August 24, 2008 at 8:51 pm
We are using a first-person script that we found on http://www.tutorialsforblender3d.com , but we’re using for our 3rd person setup in the GameBlender.org Community Project, rather than a first-person setup. Anyways, here’s something to get you started (it’s not as complex as Social’s FPS template, and it should be pretty simple to understand 🙂 ):
http://www.tutorialsforblender3d.com/Game_Engine/MouseLook/MouseLook_First_1.html
August 25, 2008 at 8:37 pm
well ok but this is my first python script (dosn’t work).
but im not looking how to
im looking on what i can change or remove from my script
August 26, 2008 at 6:15 pm
i have made my guitar hero game its called guitar rage:)
August 29, 2008 at 4:35 pm
ok can some one tell me how i can make my own fps script rather than just use one.
September 13, 2008 at 7:52 am
how do i make a working fps script?
September 17, 2008 at 7:22 pm
iv made my own guitar hero game
with level editor but it dosn’t let you try the level you made
October 6, 2008 at 11:56 am
does any know what i can do in blender
i have ran out of ideas
February 15, 2009 at 5:09 pm
After following all the steps it still didn’t work. following the steps isnt my problem because i have repeatedly and carefully and im sure there isnt a thing that i missed. my problem is that when i apply the font image to my plain and set it to alpha, my plain still had the white texts with the black background. nothing changed
March 3, 2009 at 12:53 pm
Your problem might be that you don’t have alpha channels set up properly on the image that you’re using.
March 18, 2009 at 12:28 pm
I am making a car game and I would like to know if realtime text could give me a number which indicates my place in the race like, if I’m leading (number 1) or second (number 2) and so on… =)
March 25, 2009 at 10:18 am
Ok, I did so exactly as it can be done. But for me, it only shows “@” mark at the texture view and nothing when BGE is on… I use version 2.48a. is there any things to do differently with my version?
April 8, 2009 at 1:50 pm
nice, i dont know how it works
but it works xD
just wonder how Blender can make the text, just with that @
September 5, 2009 at 3:28 am
Grrr I do it and I always get “@@@@@@@@@@@@@@” instead of “Hello World!!!”
I’ve gone back through step by step twice and always get the same thing. Its starting to annoy me. The .blend file works fine.
December 7, 2009 at 7:41 pm
You may need to reload the image or the blend file. To reload the image, just press Alt+R in the image editor.
December 4, 2009 at 4:36 pm
Thank you so much for the tutorial and file sharing!